For much of my younger and adult life, I was the near opposite of an outdoorsy person, and the thought of a strenuous hike or sleeping in a tent was far from my idea of fun. Since getting the bug for landscape photography, I have progressively gotten more and more into the outdoors and everything that comes with it: road trips, hiking, and camping. This has been both out of necessity and because I have grown to appreciate the experience through my growth as a photographer. The first time I tried astrophotography, I camped and slept in a tent out of necessity because the dark sky park I went to only allowed you to stay there after dark if you had a camping reservation.
The last several years have progressed into becoming more outdoorsy, and the latest frontier of that has been getting into overnight wilderness backpacking and sleeping miles into the backcountry to take photos in remote locations. Last summer, I was doing a long day hike in the late afternoon in Glacier National Park. It was when I passed a backcountry camping area and some overnight backpackers who asked if I was going to camp there or keep going that I realized it would be less work for me to just sleep overnight in the wilderness than to day hike in and back from some locations in the same day. After that trip, I made it a goal to try out backpacking and had my first trip last fall, which was a success.
Backpacking for Photography
All my experience with hiking and backpacking centers around photography and my experience around that goal. When trying to get information about a trail or backpacking trip, I have learned the hard way that it is most valuable to get information from other photographers since they understand what makes a great photo location and the particular nuisances that come with photography. Normal hikers and park rangers mean well, but I have been burned by their idea of a great hike and campsite with good views, which turned out to be problematic for photography.

Weight Considerations
Backpacking with a bunch of photo gear presents some challenges. Cameras, lenses, tripods, and other equipment add up in size and weight, and we need to carry all of this and everything else to be self-sufficient and sleep in the wilderness. This includes the sleep system, shelter, food, water, cooking gear, clothes, first-aid, and other essentials. I have recently read tales of other photographers carrying 75+ lb packs with all their gear on backpacking trips to shoot landscape and astrophotography. This seems a bit insane to me, and from my experience, it is possible to carry the essentials along with a decent photography kit for both my astro and infrared-specific needs and be in the realm of traditional backpacking pack weights of around 35-45lb.

Ultralight backpackers sometimes go to extremes of keeping their pack weights to 20lb or less for long trips. I have learned by looking at their techniques to find areas where I can shed weight to compensate for carrying a photo kit. My philosophy is to shed weight and go ultralight in all areas where it is reasonable and convenient, and this offsets the weight of my photo kit and puts me at a more reasonable pack weight for a strenuous backpacking trip. The more weight on your back, the harder the hike will feel, so it is a delicate balance between bringing the gear you need and not destroying yourself by hauling too much.
The Pack
The first and most important piece of your kit is the pack itself. In my experience, this is one area you want to avoid going ultralight on. Lightweight packs are designed to carry light loads, and a properly fitted and supportive pack will conform to your body, distribute weight to your hips, and make carrying a heavy pack feel much lighter. Some companies make camera bags, which they advertise as being hybrid packs and suitable for overnight backpacking trips with camera gear. These are from brands like Shimoda, F-stop, and Atlas packs. I purchased and tried my Shimoda Action x50 for an overnight trip, and my thoughts are that it would be fine for a lighter load, but it is not anywhere near as supportive as a proper hiking backpack since it has thin shoulder straps and waist belt and not the best frame. Loaded up with multiple cameras, a star tracker, a sleeping pad, and a quilt, it fit all my gear, but the straps dig into my shoulders, and the hip belt leaves something to be desired. It would be closer to an ultralight backpacking pack design, which I would also not recommend, so it will be left for day hikes.
With that in mind, I tried on and fell in love with a big 65-liter Osprey pack. I found the Osprey Atmos 65 fit me very well and conformed to my back and hips, and it makes carrying up to 50 lb loads feel manageable with lots of space. A few brands make comparable packs for backpacking, so I recommend going to an outdoor store and trying some and getting fitted. These packs are not designed for photography, but that is easy to work around.
I pair that pack with a smaller padded camera pod to hold photography gear. I found a cheap one online that works fine and fits in the big compartment of the pack. I also have a couple of small neoprene camera and lens sleeves that work well, so I can throw a loose camera with lens and separate lens right in the pack and not worry about it. This often works better to maximize space efficiency and is lightweight, and paired with a zippered pouch for odds and ends like batteries and filters can work well. Most backpacking packs have a side pocket you can strap a tripod into.
Shelter and Sleep System
The area that is easiest to shed a lot of weight and go ultralight is your shelter and sleep system. For overnights in dry conditions, when I am absolutely sure of the weather forecast, I will ditch the tent entirely and cowboy camp; the rest of the time, I bring a tent. There are many options for ultralight backpacking tents, and some can get into the very expensive territory, but I have found a couple of great options at other price points. Trekking poles are essential if you are hiking with a full load. That allows you to use a trekking pole-style tent that foregoes any aluminum poles and uses one or both of your trekking poles to provide structure.
My first backpacking tent was a budget trekking pole style and a model known as the Lanshan 2. These are imported and can be found under a few different brands. I was very happy with the quality for the money, and these can be found for about $140. The drawback is that you need to use your trekking poles to pitch, and they require more points to stake out.

This worked well, though I sometimes found I would want to use my trekking poles after pitching to hike around in the dark or set up a base camp for a couple of days, and then I would have to lower the tent partially to borrow a trekking pole. It was hard to beat at 2.9 lbs of total weight for the 2-person, but I have recently tried a freestanding tent. Comparable weight freestanding and semi-freestanding tents will be quite a bit more expensive, but I wanted a slightly simpler pitch on rocky ground and not to tie up my trekking poles. I have been trying out a Nemo Hornet Osmo 2p, which is slightly lighter and semi-freestanding, and it has been working great so far.
The tent footprint is another area where you can save weight. Most tents, annoyingly, do not come with a footprint and require you to purchase one separately. This adds another expense and often significant weight. You can either ditch the footprint entirely, which many people do, or opt for a cheaper alternative that weighs almost nothing—a sheet of polycryo. Polycryo is a plastic sheet film that is sold to insulate windows. Polycryo is popular with ultralight hikers and is very tough if you get a thicker type, offering a moisture barrier and protection from sharp rocks. I use Duck brand max strength window insulation; a box will run $20, and the sheet can be cut to size.
The next essential is your sleeping pad. I recommend looking for an ultralight option here as well. The sleeping pad is vital for providing insulation between you and the ground. We lose much of our heat when sleeping through the ground, so an insulated pad is just as important as a sleeping bag or quilt. It is best to go to a store, try laying on some to see what you are comfortable with, and pick an insulation rating suitable for the temperature you are planning. I use an Exped Ultra 5r, which I found is a good balance of comfort, insulation, and weight. I did puncture one on some sharp desert rocks, so I now have a folding closed-cell foam-type pad for those conditions. Foam sleeping pads like the Nemo Switchback are simpler, can’t be punctured, and are quicker to set up and take down than an inflatable pad, but they do not offer as much insulation and comfort.
Your sleeping bag or quilt is the other essential of your sleep system and where things can get tricky. I have tried several options and changed things around. For sleeping bags and quilts, your lightest and best option will be something with high quality down, ideally 800+ fill power. The quality of down is rated by its fill power, with higher ratings providing better loft and insulation at a lower weight. One thing I have been converted on from the ultralight crowd is using quilts instead of traditional sleeping bags. The bottom of a sleeping bag does not provide much insulation when the down or synthetic is compressed under your body weight, and the insulation comes mainly from the sleeping pad. Backpacking quilts have a closed foot box but are open on the bottom to save weight and let all the bottom insulation come from the sleeping pad.
This allows significant weight and space savings, and in some cases, cost savings since they are not wasting expensive down where it is least necessary. I have an REI Magma 30° Trail Quilt, which I am mostly happy with. For temperatures in the 30s and below, I would opt for my warmer 10° 800 fill power down sleeping bag, but I would not hesitate to try a lower temperature rated quilt for slightly colder conditions if I didn’t already own it. For true winter camping, I would stick with a mummy sleeping bag.
Food and Cooking Gear
If camping in bear country, proper food and toiletry storage is essential. Your best options are a certified bear canister or another approved device like a Ursack. Bear canisters can be bulky and heavy, but they are straightforward to use and offer peace of mind from critters as well. I have the smallest bear canister on the market—the Bare Boxer—and it is manageable in size and only 1.6lb. It can only hold about two days of food for one person, maybe three if you stretch it, so it is mainly for overnights. I have recently been using a Ursack, which can hold quite a bit more, is flexible, and is secured by being tied to a tree. A bear can still theoretically crush your food; they just won’t get to it. The traditional bear sack hang can also be an option, but this is very easy to mess up. Finding a suitable tree can be a pain, and most people do not do them properly, so I recommend sticking with the other two options.
Other odds, ends, and essentials like your first aid kit, knife, trowel, toiletries, water filter, and camping stove can also be trimmed down, and ultralight hikers can give you some inspiration. For cooking, I use a Soto wind burner stove, a Toaks 750ml titanium pot, 4 oz of fuel, titanium spork, and I eat dehydrated backpacking meals. That’s it—no heavier and bulkier Jetboil cooking system, and I have foregone the separate coffee mug and just drink instant straight out of the pot. You could go to a no-cook setup and save even more weight. For camp shoes, I have used some ultralight slip-on water shoes and now some Xero sandals, which are very light and double for crossing rivers.
Headlamp
A headlamp is vital to have, and particularly for astrophotography, you want one with a good white and red light. For convenience, a headlamp that is USB rechargeable is ideal. A great ultralight option is the Nitecore NU25 400 UL. It is designed to be lightweight, and an option with elastic cords instead of a typical elastic strap saves even more weight.
My gripe for astrophotography is if you turn it off and on again, you must cycle through the white light before getting to the red light. It is small and light enough that I still sometimes bring it as a backup, and it is chargeable by USB-C. My favorite all-around astrophotography and hiking headlamp is the Black Diamond Cosmo 350-R. It has independent buttons for power and to cycle through light types and adjustable brightness for both the white and red lights that get dim enough, and it is comfortable and not too heavy.
Power Banks
You will need a portable USB power bank to charge your phone, headlamp on longer trips, and possibly your camera batteries. A satellite communicator like a Garmin In-Reach Mini is great peace of mind to have, and you will want to be able to charge that, too. The two best options for USB power banks that maximize size and weight to charging capacity are the Nitecore NB10000 and NB20000 power banks, which are popular with ultralight hikers, though they are expensive.
I have also found that Anker makes quality USB power banks that meet the specs, are a good value for the money, and only weigh a couple of ounces more than the Nitecore options while costing much less. I have yet to switch over completely, so I bring an NB10000 and another Anker power bank. I often run a camera overnight, shooting timelapses hooked up to a USB battery, so I need to bring more power.
Camera Equipment
Finally, for the camera-specific kit, what and how much I bring will depend on where I am going and how strenuous the hike will be. At a bare minimum, I bring my full spectrum Sony A7R IV, a lens, extra batteries, some infrared, astro, and hot mirror filters, an air blower, and a tripod with a ball head. Carbon fiber tripods offer significant weight savings, and I will usually bring a mid-sized carbon tripod that is sturdy but smaller than my largest full-size tripod. I also have a very small ultralight Aoka tripod I will sometimes bring as a second option for a timelapse camera, but it is very short and works best in low mode perched on top of a boulder weighed down with a small mirrorless camera.
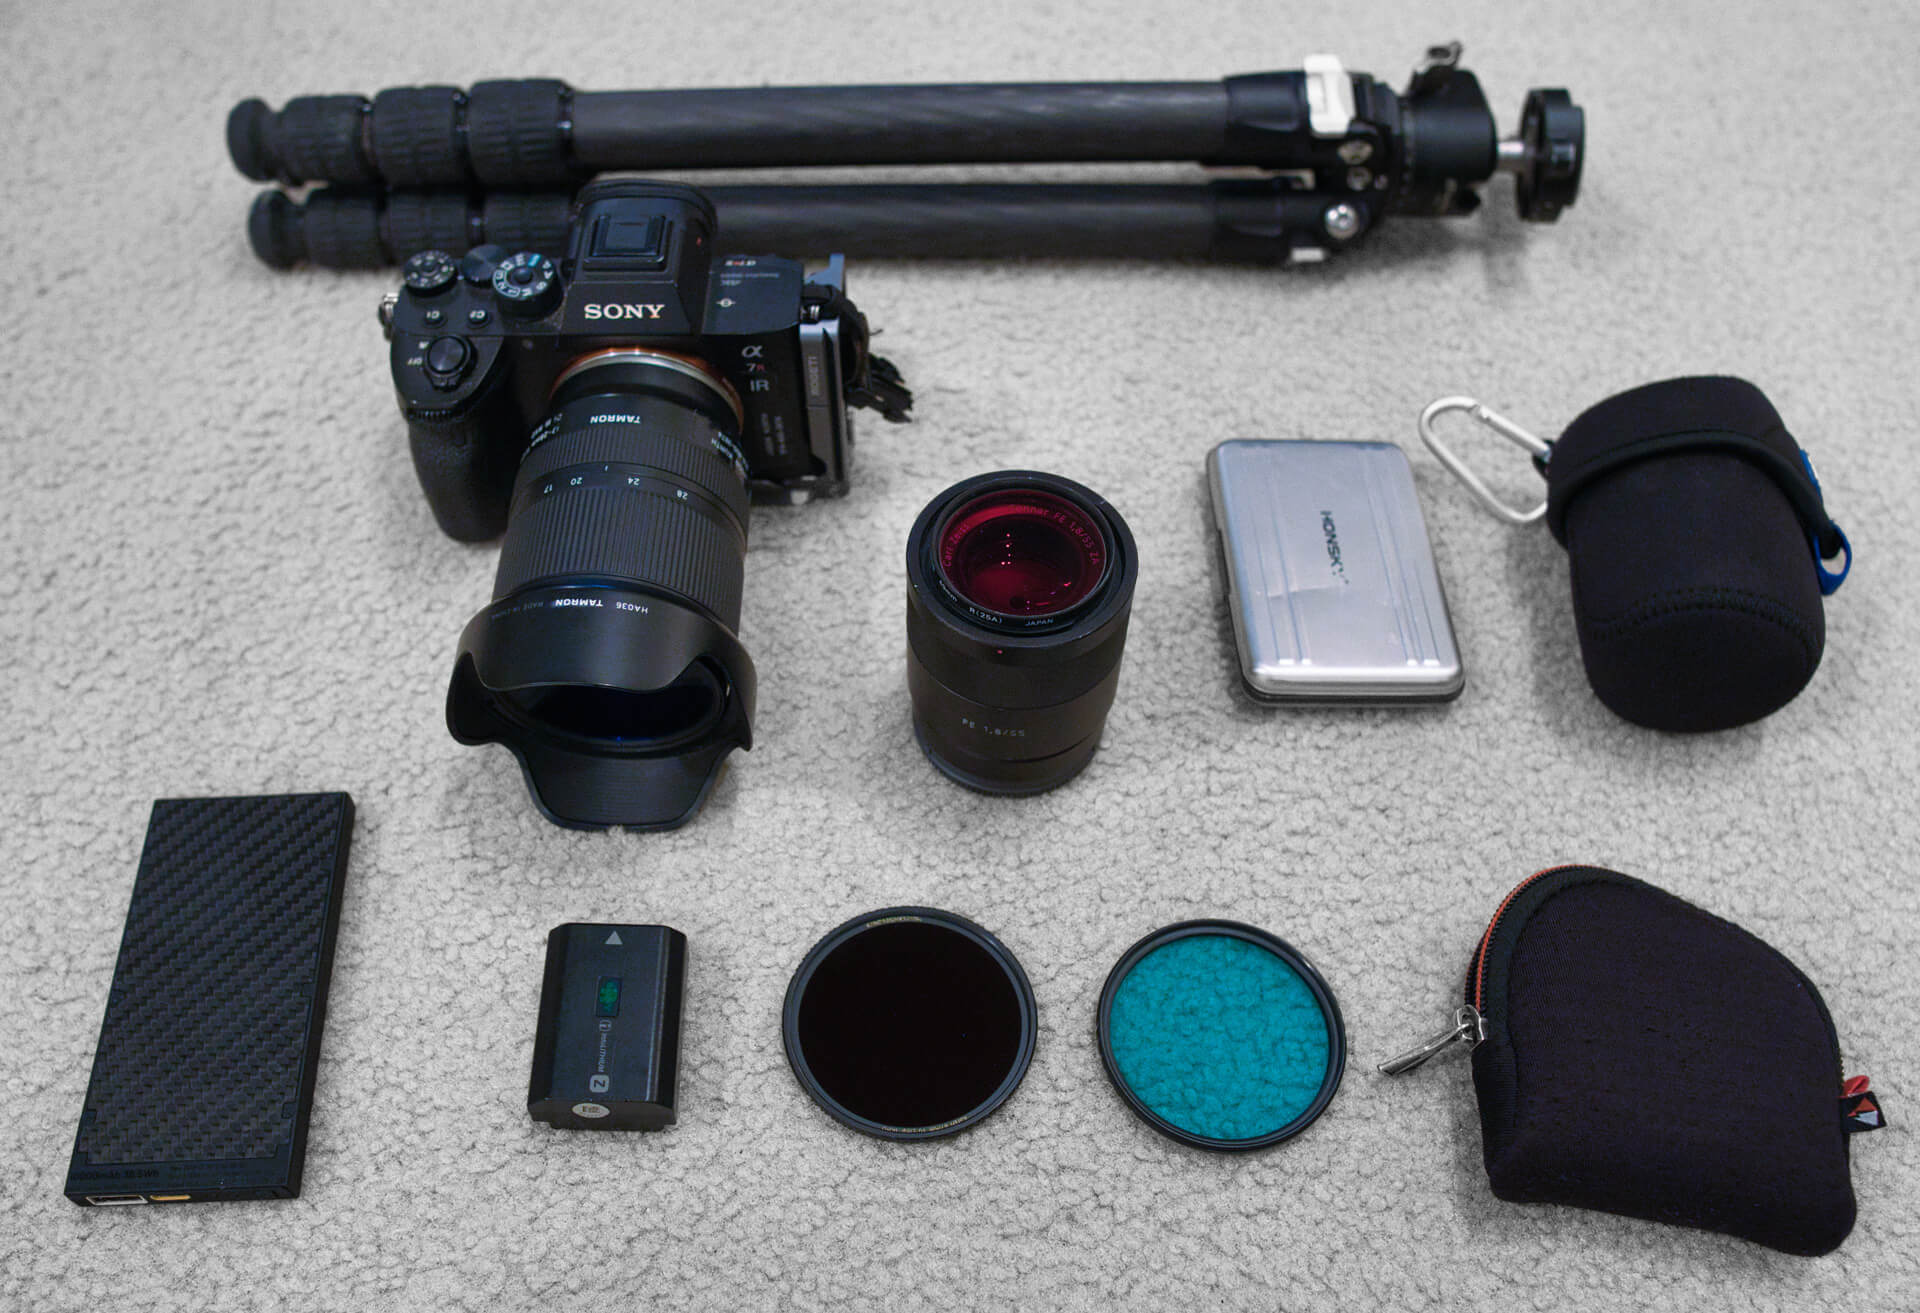
Mirrorless cameras have a significant advantage over older DSLRs in terms of weight and the weight of their corresponding lenses. For lens selection, I must be more mindful than I usually would be. The big heavy Sigma Art lenses would stay home, and I opt for more compact lenses like my Tamron 17-28 or 28-75, Sony 20mm f1.8, or Sony 55mm 1.8. Lately, it has been the 17-28mm as an all-around lens for both astro and infrared, along with the 55mm 1.8, which is very small and one of my favorite lenses for infrared.
For infrared and astro filters, I will always bring IR Chrome and maybe a 590nm or 720nm filter, along with a hot mirror filter and astro IR cut filter. Clip-in filters save quite a bit of space and weight compared to a stack of mid to large size screw-on lens filters. I will also sometimes bring my astro-modified Sony A6500 and a Sigma 16mm f1.4. This setup has been my choice for astro night timelapses—it is small and light, and the fast aperture is great for timelapses. I power this with a dummy battery over USB.
Whether or not I will bring along a star tracker will depend on what else I am bringing and my goals and plans for the trip. A star tracker will add several pounds of weight, and the smallest one I have found to be worth bringing is my iOptron Skyguider Pro without the counterweight and just using a ball head. There are some smaller and lighter options, like the Move Shoot Move tracker, but I have no personal experience with it, and from what I have heard, it only works well with wide-angle lenses. If you are shooting with some fast f1.4 or f1.8 wide-angle lenses, bringing the tracker might not be necessary, and this is my preferred setup for night timelapses.
Overall, trying out backpacking for photography has been incredibly rewarding and has taken me to some amazing locations that would be impossible compared to roadside spots or typical day hikes. I had to work up to it and really want to do it, but I am excited to push my limits on some longer trips and see where it can get me for some epic infrared and astro photo locations.
Backpacking for Photography FAQs
What Should Photographers Pack For Wilderness Backpacking?
Photographers should pack both normal backpacking essentials and camera-specific gear. The article covers a supportive hiking backpack, shelter, sleep system, food, water, cooking gear, first aid, headlamp, power banks, camera body, lenses, filters, tripod, batteries, and accessories.
How Heavy Should A Photography Backpacking Pack Be?
The article suggests that it is possible to carry essential backpacking gear plus a solid astro and infrared photography kit in the range of about 35–45 lb, instead of extremely heavy 75+ lb camera backpacking loads.
What Backpack Is Best For Carrying Camera Gear On Overnight Trips?
For overnight photography backpacking, the article recommends using a proper supportive hiking backpack rather than relying only on a camera backpack. A padded camera pod, neoprene sleeves, and small pouches can help organize camera gear inside a larger backpacking pack.
What Camera Gear Do You Need For Astro And Infrared Backpacking?
A basic camera kit can include a full-spectrum camera, one or two lightweight lenses, extra batteries, infrared filters, astro filters, a hot mirror filter, an air blower, and a tripod with a ball head. The article also notes that clip-in filters save space and weight compared with carrying several large screw-on filters.
Why Are Power Banks Important For Backpacking Photography?
Power banks are important because photographers may need to charge a phone, headlamp, camera batteries, satellite communicator, or camera running overnight for timelapses. The article recommends choosing power banks that balance charging capacity, size, and weight.