Written by Jason Kurth
The April 8, 2024 North American total solar eclipse is rapidly approaching. It will be the last total solar eclipse over the United States for 20 years, so you do not want to miss it! This event is going to be a big deal, and if you have been on the fence about it, haven’t made any plans yet, or need equipment to help you photograph it is not too late, but time is running out.
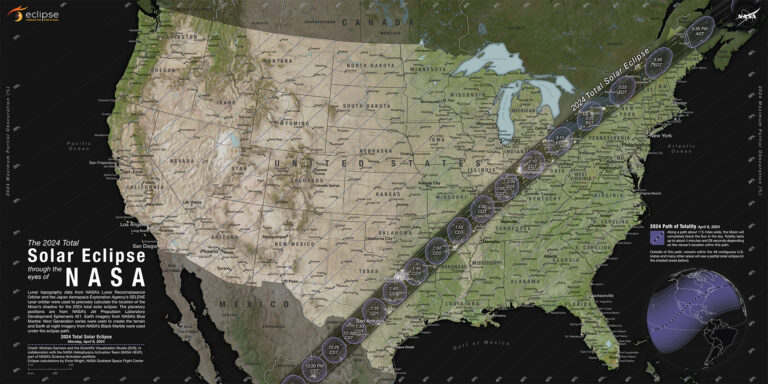
Path of totality
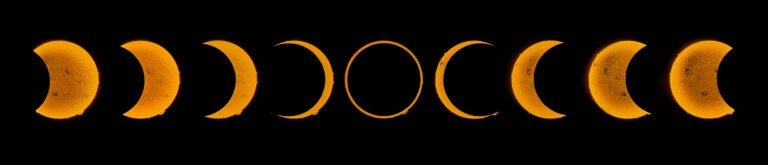
The eclipse will begin over Mexico on April 8th, then make its way over parts of Texas at 1:30 PM, then Oklahoma, Arkansas, and Missouri before parts of the Midwest and finally northern New York, Vermont, and Maine. For the detailed path, you can study the path of totality here and below to find key towns and cities. To truly experience this eclipse in all its glory you must travel to and be in the center path of totality. Anywhere outside of this path will only experience a partial eclipse, which while worth observing is nothing like experiencing totality when day appears to turn to night, and you can observe the magic of the solar corona and all the amazing phases of the total eclipse.
This eclipse will mainly be challenging due to chances of clouds and weather conditions. Historical cloud patterns for April 8th are not favorable to most areas in the path. The northeast and parts of New York, Vermont, and Maine historically have 70%+ chances of clouds at this time. The Midwest is not much better, and as you get further south in the path there are the best odds. Texas will be eclipse central and historically has the better odds of clouds but still chances hover around 50%. The die-hard eclipse chasers will be observing this from Mazatlan, Mexico which has chances of clouds closer to 30%.
Climatology only goes so far, and anything can happen weatherwise on eclipse day. We won’t start to have a better idea until about a week out, and really only a good idea 3-4 days before. If you are planning to travel for the eclipse, you may be about 10 months late to find affordable lodging on the centerline. Even if you managed to book something early, hotel and short-term rental cancellations are very common and they have been known to cancel bookings in order to rebook at much higher rates. That personally already happened to me at a hotel I booked in Gatesville, Texas along the centerline. My reservation as cancelled due to “renovations”, but it became available a couple months later for six times the price. This type of story is not uncommon and happened a lot during the 2017 North American eclipse.
Preparing for the solar eclipse
Still, you are not too late depending on how flexible you can be with travel and level of accommodations. If you are willing to camp, there are many private farms and ranches that have opened to eclipse campers in Texas that you can still find. Camping rates average about $500 for the weekend from what I have seen (there are some listings on cloudynights.com forums). Renting an RV or campervan would be a good way to enjoy the eclipse and give you some mobility to chase weather the day before. Or if you have an SUV and can tolerate it, just throw an air mattress in the back and car camp. Flying to the eclipse is an option but you may be too late for this. Even if you can still find a flight, car rentals at all the airports in Texas have been sold out during eclipse weekend for months.
For eclipse viewing locations, there are many eclipse viewing events being held in cities in the path. Parks and natural areas are a popular option but be sure to check these well in advance. Many parks are requiring reservations for access on eclipse day and have long been sold out.
Do not underestimate eclipse traffic. Millions of people will be traveling to the centerline for the eclipse. Plan to be at your location for the eclipse the day before and do not try to drive on the morning if eclipse day. If you absolutely must, I would not get on the road after 4 AM. Traffic will become gridlocked on many of these roads. Even the day and weekend before, it is possible you could get caught in major eclipse traffic in certain areas trying to get to the path and I heard similar reports of this in Oregon in 2017. Traffic will be even worse right after. Plan to stay put and relax at your location the night before and right after the eclipse for best results and to avoid the worst eclipse traffic.
Photography Equipment Considerations
Now, for photographing the eclipse you will need an appropriate solar filter or ND filter to protect your camera. These include rated solar filters and high-quality ND filters of at least 15 stops. Do not use any normal ND filter for visual use, these are safe for cameras only. For the partial phases of the eclipse, exposure settings will not change for the duration, and you can practice these and find your proper camera settings in advance by photographing the sun with the filter beforehand. This is also good to practice finding the sun with your camera. You can make a cardboard solar finder for your camera or just practice this without, since it can be tricky since you can’t just look at the sun to help you find it.
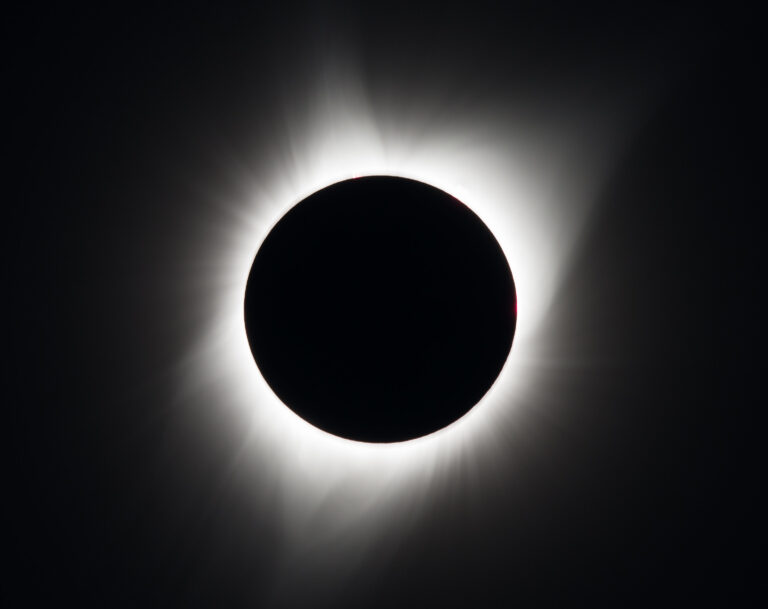
The next big consideration for this is choosing a proper lens and camera. During totality, the solar corona is the most interesting part of the eclipse to photograph, and it will extend several solar diameters outside of the sun so you do not want too long of a focal length to cut this off. For a full-frame camera, 500-600mm will give you a wide view and opportunity to photograph the far faint extents of the solar corona. 1000-1500mm will give you a more detailed view of the solar chromosphere and ability to photograph the moon illuminated by earthshine in more detail, while still being able to capture most of the corona. 2000-2300mm will give you a more detailed view but will cut off much of the corona. Around 1000-1300mm is probably the sweet spot if you have a lens or telescope in this range, but 600mm will give you a nice view if you have a higher resolution sensor. For crop sensors, apply your cameras crop factor (1.5x for APSC) for equivalent focal lengths.
Close-ups of the eclipse are not the only interesting views, and having a camera with a wide angle to catch the eclipse and the landscape and the gradation in the sky is worth planning as well. The sun will be very high in the sky in Texas during totality, and to catch the eclipse and some foreground will require a 14-18mm lens in portrait orientation. The sun will appear tiny at this focal length but may still make a cool shot.
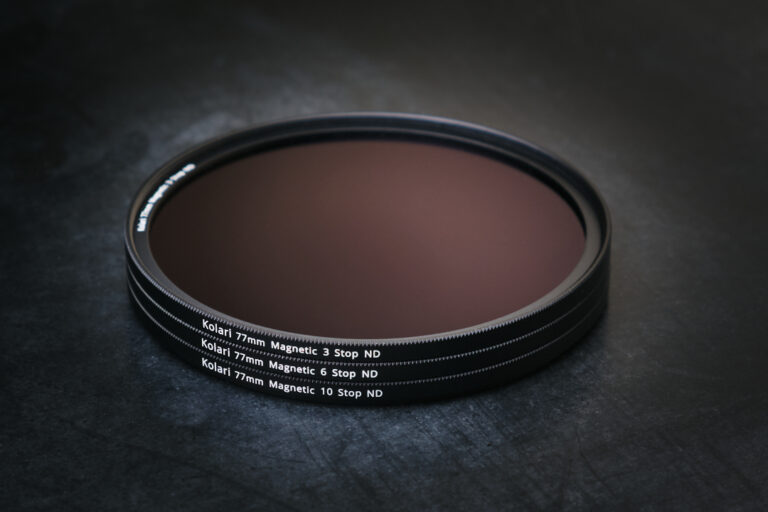
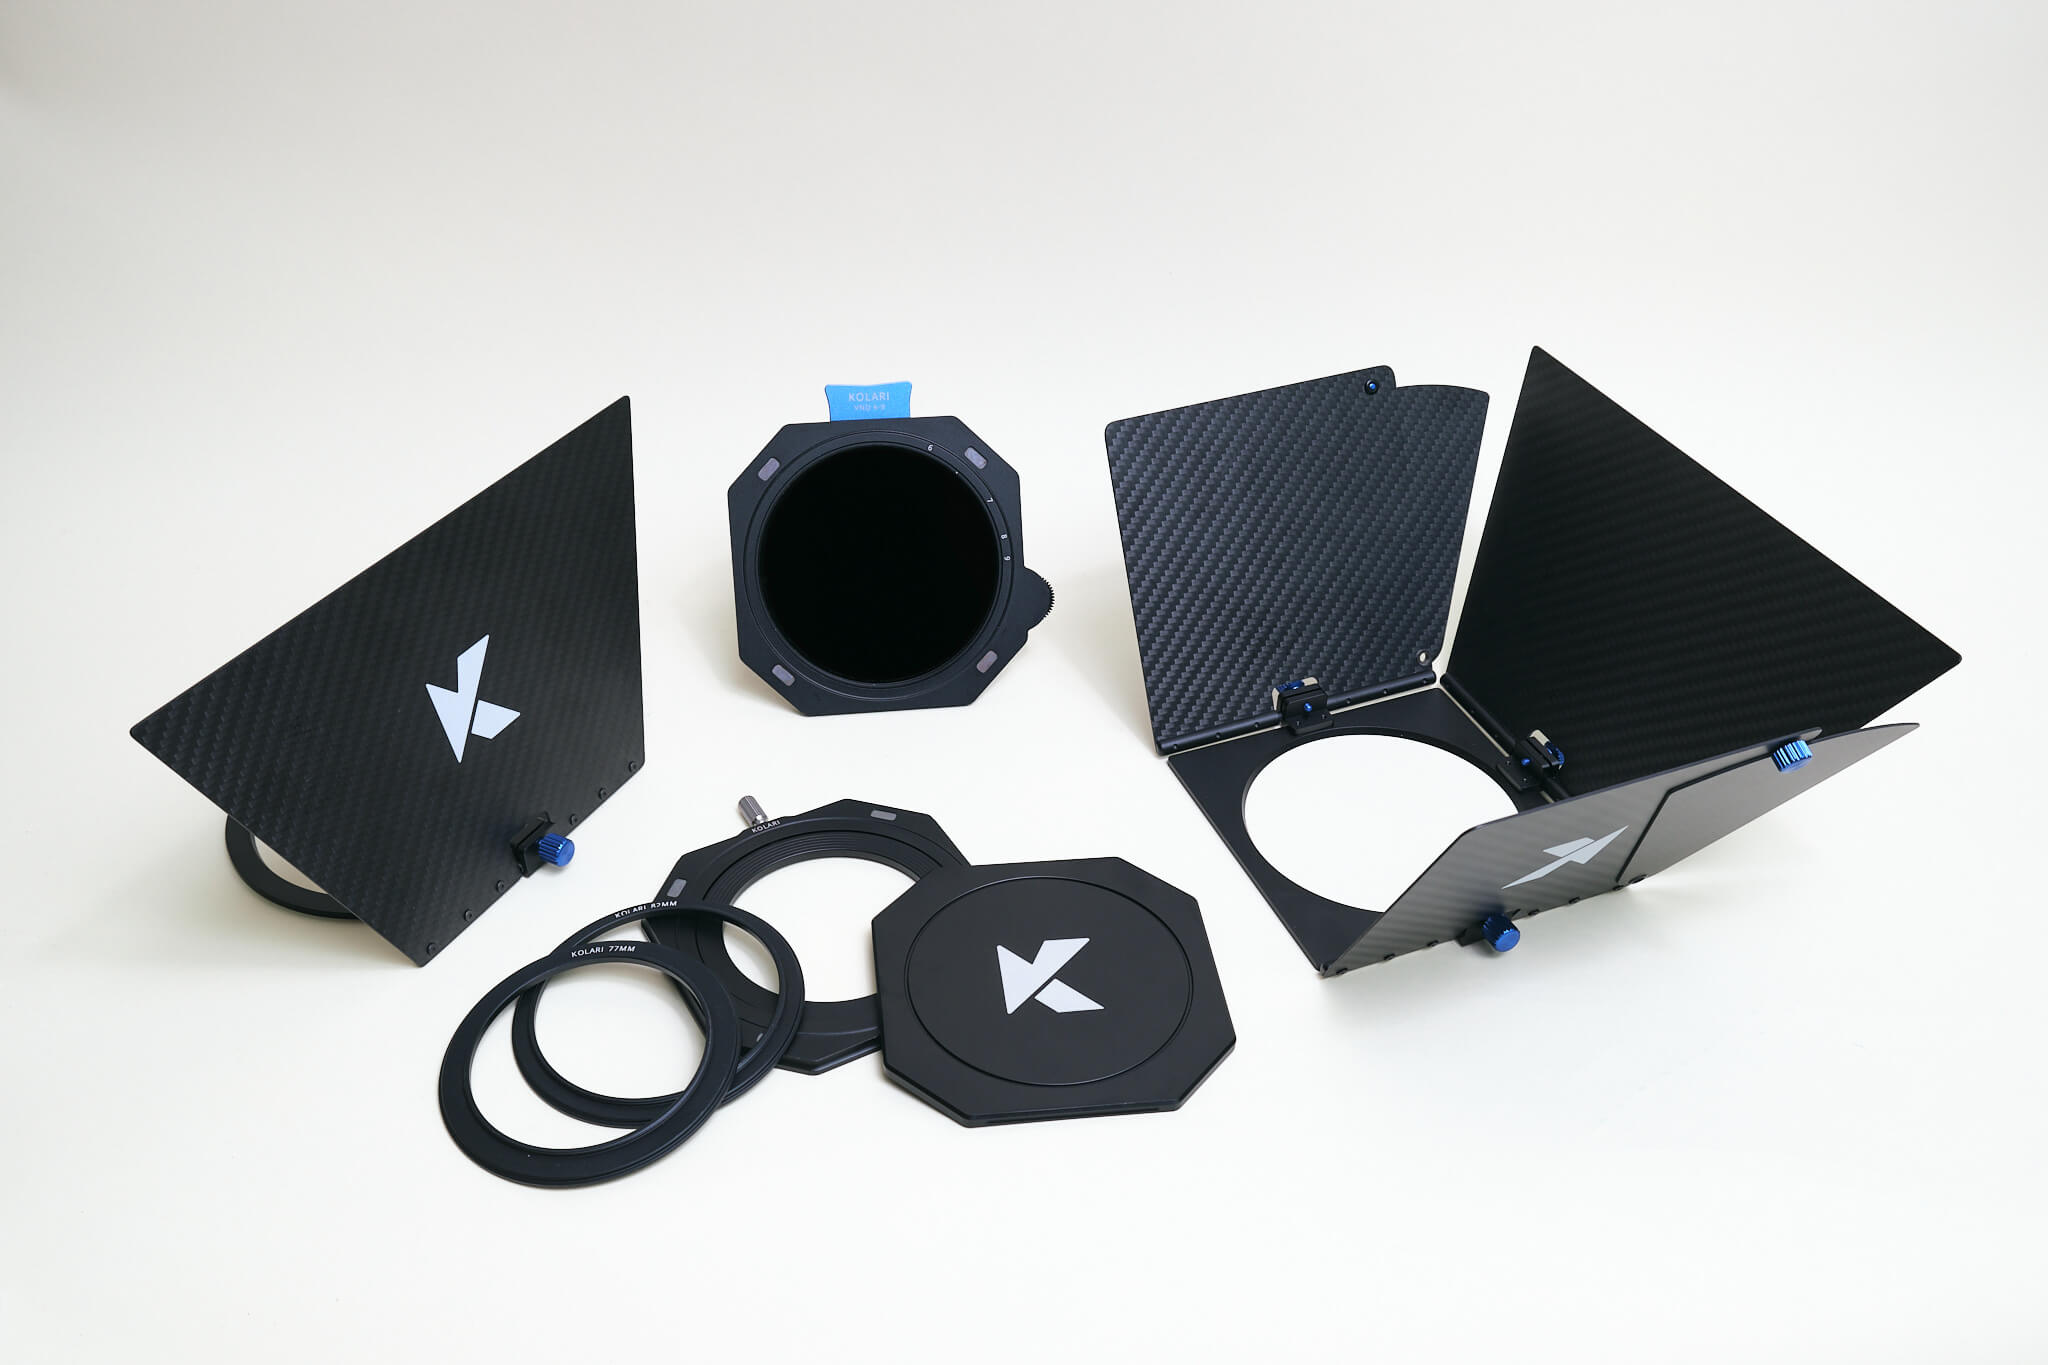
For the solar filter you use, the key is to have something you can easily remove during totality and quickly put back over your camera and lens at the end of the total phase. Traditional solar filters usually go over the lens hood and are press fit. While fine for the annular eclipse and partial phases, screw on ND filters will not be ideal during totality when you are under pressure to remove the filter and put it back on. Magnetic ND filter systems, such as the Kolari Pro Magnetic ND Lens Filter or Kolari Atlas, with an appropriately rated filter could work well here and would be quicker and less error-prone to put back into place at the end of totality than a press fit solar filter.
Now, for shooting the total phases of the eclipse, this is a bit more difficult to practice and plan. At totality, you will remove your solar filter and take a series of exposures. To get an idea of some settings in advance, the full moon will be similar in brightness to the inner solar corona and can give you a good baseline for settings. The key here will be to bracket like crazy as the corona has many levels of brightness and you will need a series of exposures to capture it all, and then shorter exposures for the solar chromosphere. The sun will be very active at this time, and you will be able to catch solar prominences during totality. Explore your cameras bracketing function. Most have automatic bracket settings where you can take a series of 5 or 9 exposures all a stop darker and brighter than your target exposure. You will want to keep you ISO low at your base ISO setting, find an appropriate shutter speed to what works on a full moon, and then bracket from there.
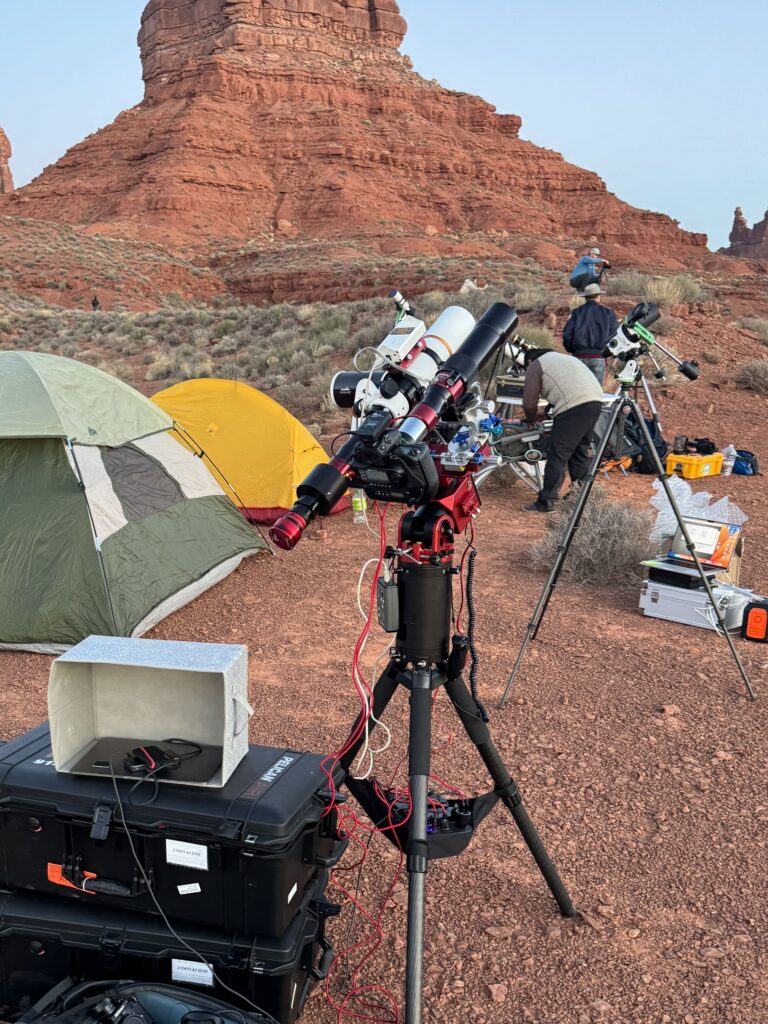
As for timing when to remove the filter, you can look up exact times for totality based on your location. There are also some useful paid apps available that will help you with this and give you countdowns and announce when to remove and put back your solar filter. As for other equipment, a star tracker or equatorial mount will help in keeping the sun centered over the course of the eclipse. Otherwise, a gimbal head for telephoto lenses is a much better option that a ball head since you will have to continuously track and find the sun manually. You should also consider memory cards and your camera’s buffer. During totality, you will be taking many bracketed exposures and these can quickly fill up your camera’s buffer and slow down your shooting causing you to miss shots. If you only have inexpensive slower memory cards, this will be a bottleneck and you should consider investing in the highest speed memory cards available for your camera. Other things to have include a shutter release cable or external intervalometer and extra batteries.
The most important thing is to try to observe and enjoy viewing the eclipse as well and not be glued to your equipment the entire time so that you miss out on it. Practice in advance so you know what to expect and can relax during the eclipse. It is going to be stressful around totality so try to get setting dialed in beforehand so you can just remove the filter and have your camera do the work for you. Hopefully we all can find clear skies and experience this event, it may truly be once in a lifetime for many of us.


3 Responses
Thank you for this entry! I am wondering how important is it to my sensor’s health to have IR rated ND filters. I have a ND64000/16 stop filter that does not seem to be IR rated, will my sensor be damaged?
Cheers…
Tim.
We haven’t tested it, but if you are blocking 16 stops of visible light, you are blocking at least half of the light that could reach your sensor, so you are mathematically blocking 14-15 stops of total light. That said, proceed at your own risk, we have not tested it and cannot make any guarantees. Your sensor is not really at risk overall, it is the shutter specifically that can burn, and worst case this can be replaced if needed.
Cheers Ilija! My D600 has a full-conversion and the goal is to use the Kolari UV/IR cut (H-alpha pass) filter in conjunction with the Kase ND filter to photograph the sun. I appreciate your wisdom.