If you’re on social media, you’ve probably seen a lot of incredible video content, whether it’s funny memes, compelling documentaries, informational video essays, or cinematic travel vlogs. While it is fun, video editing is a lot of work. There are a lot of elements that can go into making a video. Today, we’re going to condense the technicalities of video editing into an easy-to-follow guide to make it easier to understand.
A-roll versus B-roll
Before you edit your video, you need to understand the types of footage you will capture! Footage can be divided into two basic categories: A-roll and B-roll.
A-roll isn’t a common term in videography anymore, but its function is still important. A-roll simply refers to the primary footage central to the film’s core. For example, an interview in a documentary or scenes of a dialogic exchange between main characters in a sequence.
Chances are you’ve probably heard of the term “B-roll” before, whether in the context of videography or casual conversation. B-roll is the secondary footage that plays over the primary footage or in-between transitions and adds context or supplemental detail to the primary footage. It can either divert or capture the viewer’s attention, which can be effective depending on the film’s needs. B-roll could be the opening wide shot that establishes the setting of your film, or it can be quick cuts that add action to what is happening in the primary footage.
Ideally, you’d organize a shot list for your video, so you know what you’ll be filming before starting a project. Simply put, you can broadly categorize those shots as A-roll or B-roll.
Video Editing Workspace
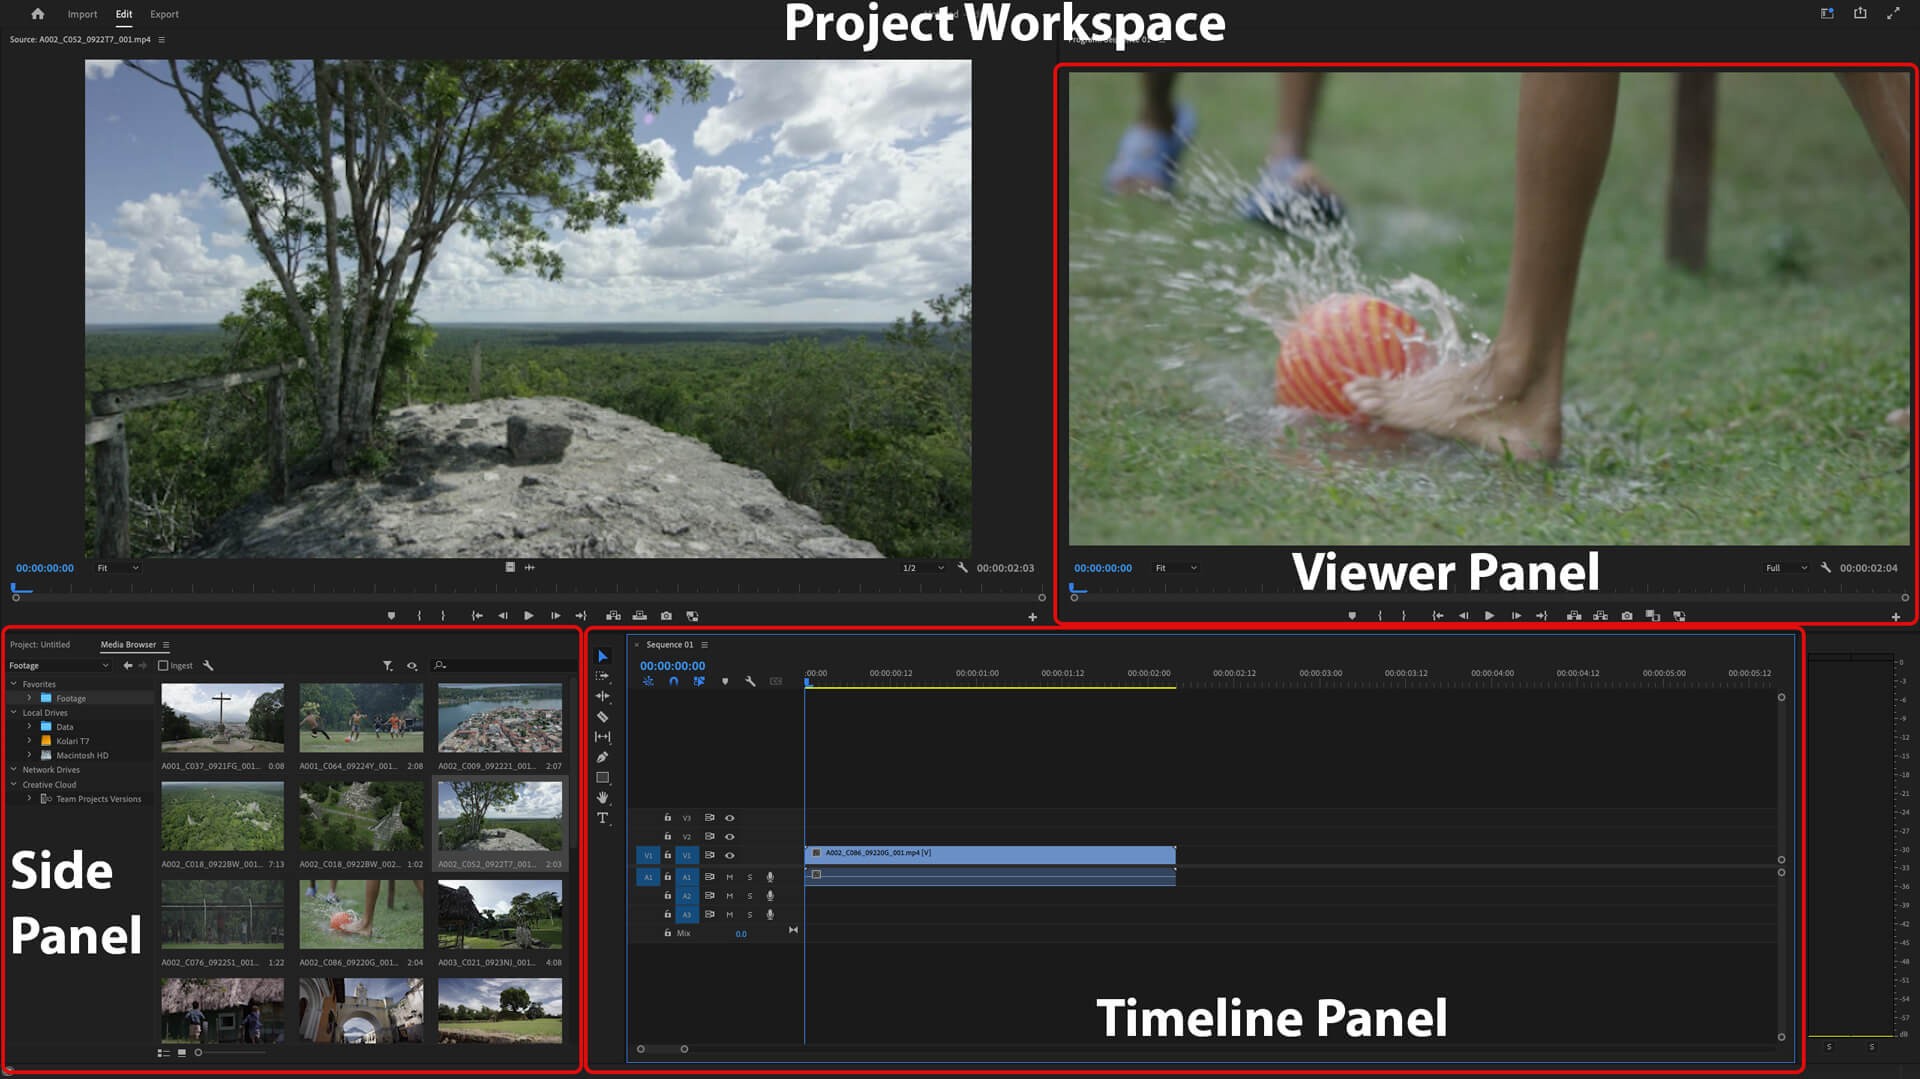
Once you have your footage, everything will be edited in a video editing program, such as Adobe Premiere Pro or DaVinci Resolve. Each video editing program has somewhat different key commands, naming schemes, and interfaces, but they all share fundamental characteristics for editing.
Project Workspace: This is the entire editing window that contains the panels, tools, timeline, effects, and storage of your video footage.
Timeline Panel: When editing your video, all the footage you use will be placed on the timeline. You can splice, overlap, zoom, cut, and extend footage in the video timeline. On the timeline, there’s a playhead.
Viewer Panel: This panel displays your footage while you’re editing. You’ll see a preview of the edits you make for your video here, or you can quickly preview shots before you drag them into the timeline.
Side Panel: Generally, this is where you’ll see your video assets. Things such as bins (where you store your footage), editing presets, transition overlays, or audio and video effects will be located in this panel.
Tools
Tools help you make edits to your video. Below are the editing tools and key commands found in Adobe Premiere Pro. The tools in each video editing program may have different names and key commands, but they still share the same function for making specific edits.
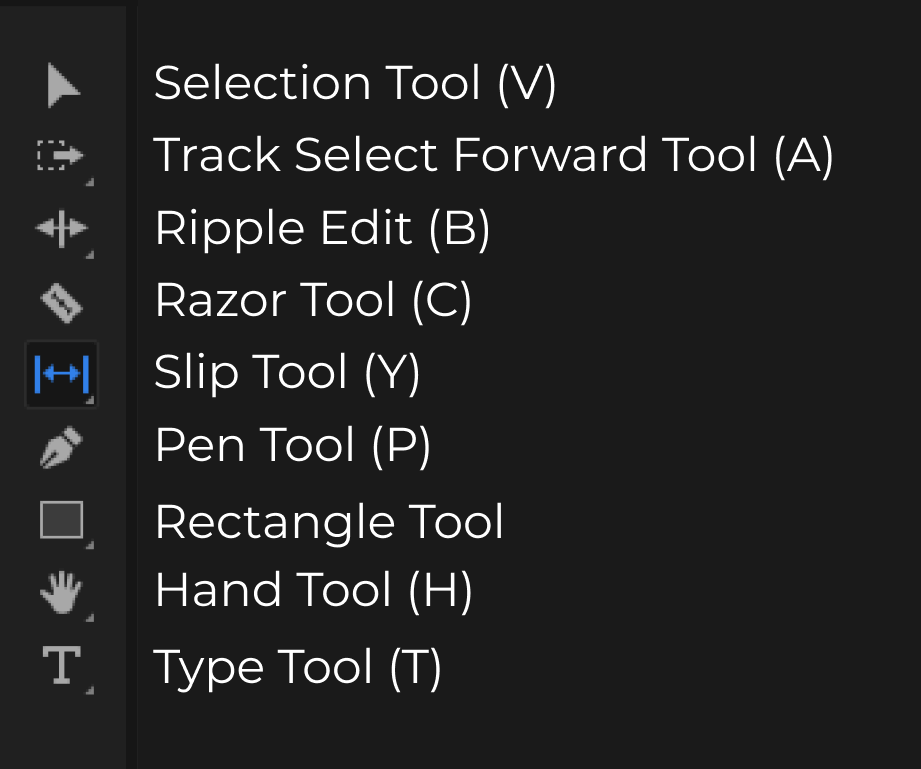
Ripple Edit Tool (B): This tool allows you to cut or lengthen a video clip while automatically adjusting the timeline to match the edit. If you shorten a video clip, subsequent video clips will connect and close the gap. If you lengthen a video clip, the timeline will be pushed forward.
Slip Tool (Y): You would use the Slip tool after a video clip is trimmed. For instance, once you have a one-minute video clip trimmed from five minutes, you can choose a specific section of that five-minute clip to play during that one-minute clip.
Razor tool (C): This editing tool splits a video clip wherever the playhead is on the timeline panel. Think about it as if you’re cutting a single clip into two separate clips.
Zoom In/Out (=/-): The zoom tool lets you magnify or minimize the timeline. Doing this can allow you to make granular edits frame by frame or view the entire video timeline.
Trim Edit (Shift + T): The trim edit tool shortens a video clip already placed in the timeline.
Hand (H): the hand tool lets you navigate around the timeline. Click with the hand tool to move forward or backward along the timeline.
Type tool (T): The type tool creates text boxes and overlays them on top of video clips. You can insert texts of different fonts and sizes and drag them around a video clip.
Pen Tool (P): The pen tool allows you to draw custom shapes for various edits. For example, the tool is handy for speed ramping, an editing technique in which footage is slowed down or sped up. The pen tool allows you to pinpoint different speeds along the footage when it plays. The tool is also helpful for drawing masks over irregular-shaped objects that an elliptical mask wouldn’t cover.
Selection Tool (V): This is the default tool used to select clips in the timeline. To select a single clip or transition in the timeline, click on the clip or transition to highlight it.
Track Select Forward Tool (A): Select all clips on a track from a given point or select multiple tracks. The track selection tool selects all clips from a given point on a particular track in the timeline.
Magnet Tool (S): This allows items, either video clips, adjustment clips, audio files, etc., in the timeline to “snap” to the ends of others. This prevents gaps in the video timeline that you wouldn’t catch if not zoomed into the timeline and makes it easier to edit a clean sequence.
Markers (M): Markers are used to keep track of specific points in your timeline so that you can be more organized and focused in your editing. A marker is placed wherever the cursor playhead is on the video timeline.
Mark In/Out: Marking in and out allows you to select a portion of a clip you would like to use before you bring it into the timeline, pre-cutting the clip so that it is precisely the length you want. Marking in and out also allows you to select the length of your final edit and highlight the parts of your edit that you want to render.
Video editing workflow
Now you should be acquainted with the basics of video editing. By understanding the footage you’ll capture for your film, the editing workspace, and the tools for editing video, you can get started with quick video edits on single or multiple clips before moving on to larger projects.
Interested in reading more about photography, videography, and infrared? Head to our Education section and sign up for our newsletter.