Make a Plan
Research the best time of year for you to head off on that trip you have promised yourself. Summer around water? It might be very buggy. Looking for clouds? Summer skies could yield bald, blue, cloudless days. Winter in areas where snow falls? How comfortable do you feel driving in the snow in a rental car, especially if you have difficult-to-change travel plans (i.e., catching the flight home)? What will you shoot if you have several rainy days in a row? One option is to drive where it isn’t raining. Part of making a plan is to be flexible! Mother Nature always wins, and no two years in a row at the exact time of the year will be the same. Hopefully, it is a place you can easily return to in the future. Be open to returning to the same location more than once. A plan also enables you to research the area and find spots you might not have known about (because you didn’t see any pictures on social media in that area). Tools that I use include Google Maps (satellite view) and websites for that specific area (such as the National Park Service website). National Park websites also have lots of trail maps for free. Photo Pills gives me the direction and hourly transits of the moon and the sun. I use a Tide app if I am going to the coast as it is crucial to see when the lowest tide during the month will be near the time of sunrise and/or sunset (hint: it’s the exact full or new moon). Be aware that some locations will not have cell phone service, so you will not be able to navigate to your ideal spot using a phone app. Without cell service, you will not be able to use many apps on your phone (maps, star guides, etc.). However, if you know you will be going to a location without reception, you can download offline maps of the area beforehand from Google Maps or Maps.me.Keep a Daily Diary
I keep a daily planning diary during trips, whether teaching or on a personal shooting trip. For each day, I record the time of the sunrise, moonrise, sunset, moonset, and low and high tides for the day, if applicable. I also note the degree on the horizon of the moonrise and moonset (Photo Pills). My iPhone compass app works without cell service, and knowing the degree of the moonrise, for example, enables me to get to the location to know exactly where the moon will be rising or setting. I arrive early and test out compositions before the “go” moment. The rising and setting moon is very quick when it is close to the horizon. I also note the general weather in my diary and all the locations visited in chronological order. When reviewing images after I get home, I can see how the light is different when I visit the same locations at various times of the year. I review all my journal entries before I return to previously visited locations to see what I might do differently and get a better shot.Foliage May Not Render as You Think It Should
White foliage (grasses, tree leaves, shrubs) is one of the characteristics of black-and-white infrared. I have discovered over the years, shooting infrared at different altitudes from sea level to over 9,000 ft, that not all foliage is infrared friendly, meaning not all foliage renders white. Long-needle pine trees of the Mid-Atlantic coast love infrared, while the conifers of Yellowstone National Park seem very dark no matter how intense the sunlight is. Deciduous trees love infrared light at any time of the year, even in the fall after they change color. The relationship of the light source to the trees and foliage and the amount of cloud cover is a consideration, but I have found there are plants that do not reflect the infrared light at all.Type of Light for Best Results
Infrared landscape loves side light and front light. What exactly does this mean? The difference between front and side light is where you and your camera are in relation to the subject and the light source.
Front light means you (and the camera) face the subject with the sun behind you. The “front” of the subject is awash in light, and the sky should be dark if you have a cloudless day. You may see your shadow in the scene when using a wide-angle lens and short focal length. Adjust the camera accordingly–up or down to avoid the shadow, or use a longer focal length. Once the sun rises high enough in the sky, the light in the scene evens out, and the sky will wash out.

Check List (yes, I forget these sometimes)
Work on a tripod, especially if using a converted mirrored camera where you’ll be using Live View for manual focus (above 35mm). It is easier to concentrate on good composition and then dial in exposure and focus. Use a faster shutter speed or increase ISO in breezy conditions to prevent blurry foliage. Use a lens shade in sunlight or moonlight. Use a Hoodman Loupe to review your images for any flares. I highly recommend it for use in strong sunlight. Check the edges of the frame for anything glaring. Reposition the camera or adjust the focal length slightly to add or remove elements. Be true to your histogram. Check your horizon is level. Get as much “right” in camera as possible. Keep a mental checklist in your head. When reviewing images, check carefully for flare (common in infrared images when shooting towards the sun). Reposition the camera slightly left or right (take two giant steps left or right) and reframe your composition to make sure the flare is gone. Flare is different than a hotspot (all flares are circled in red in the image below).
Be Prepared for Surprises – Expect the Unexpected
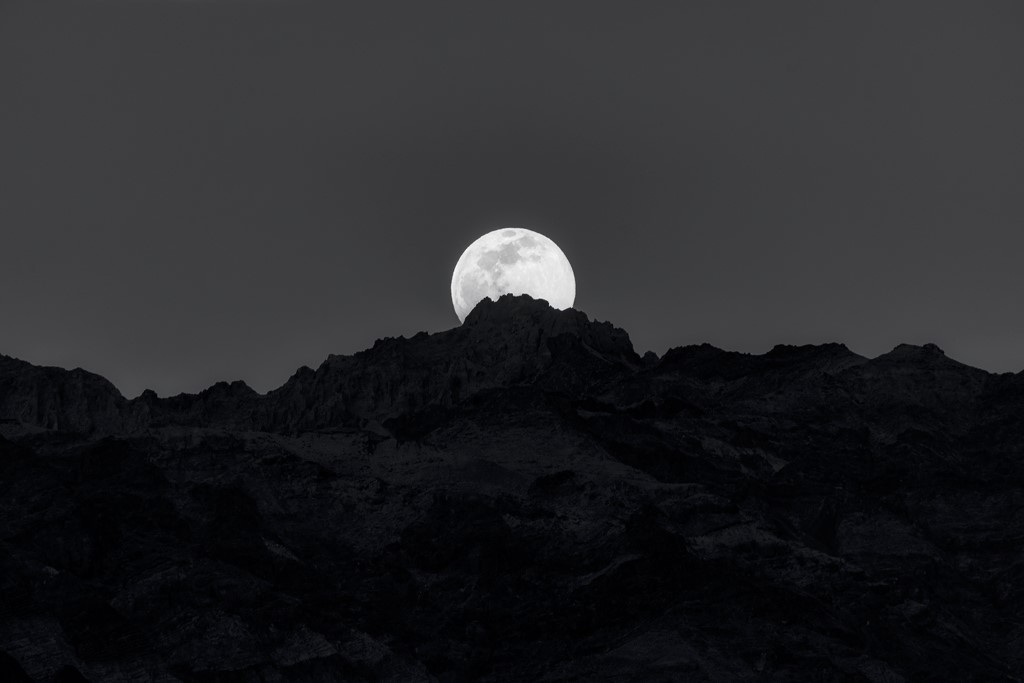
Test and try every scene that you think might work in infrared. Always ask yourself, “What would this scene, in this light, look like in infrared?” Years ago, this is how I came to shoot in the desert, in the moonlight that was front lighting the scene. As I headed to Death Valley to teach this past February, I had one of those “what if” moments. That’s how I began to shoot the moon rising in the mid-afternoon.
When you have a pre-determined outcome but do not have much experience with infrared landscape photography, I guarantee you might miss an amazing opportunity for lack of trying. It is quite different from working in visible light.
Landscape is different than a run-and-gun shooting approach for wildlife or sports. I find the best practice for landscape includes working on a tripod. It will slow you down so you can be methodical about your checklist: composition, focus, good histogram, straight horizon. The only way a human learns is by failure, not from success the first time out. I have many failures, but they have driven me to create better images over time.
Penelope Taylor
Penelope Taylor is a New Jersey-based photographic landscape artist. Her father introduced her to film cameras in her early teens. Her passion is traveling throughout the United States and Canada to capture her favorite subject — landscapes. In 2015, she began to exclusively produce work using Nikon digital cameras converted for infrared photography. In 2017, Penelope began to offer infrared-specific landscape photo workshops where she teaches capture and black-and-white processing techniques. She is available for group lectures and one-on-one instruction in person or online.